How to measure shorts
Every point, drawn on the garment so there is no guessing where the tape goes.
Quick answer
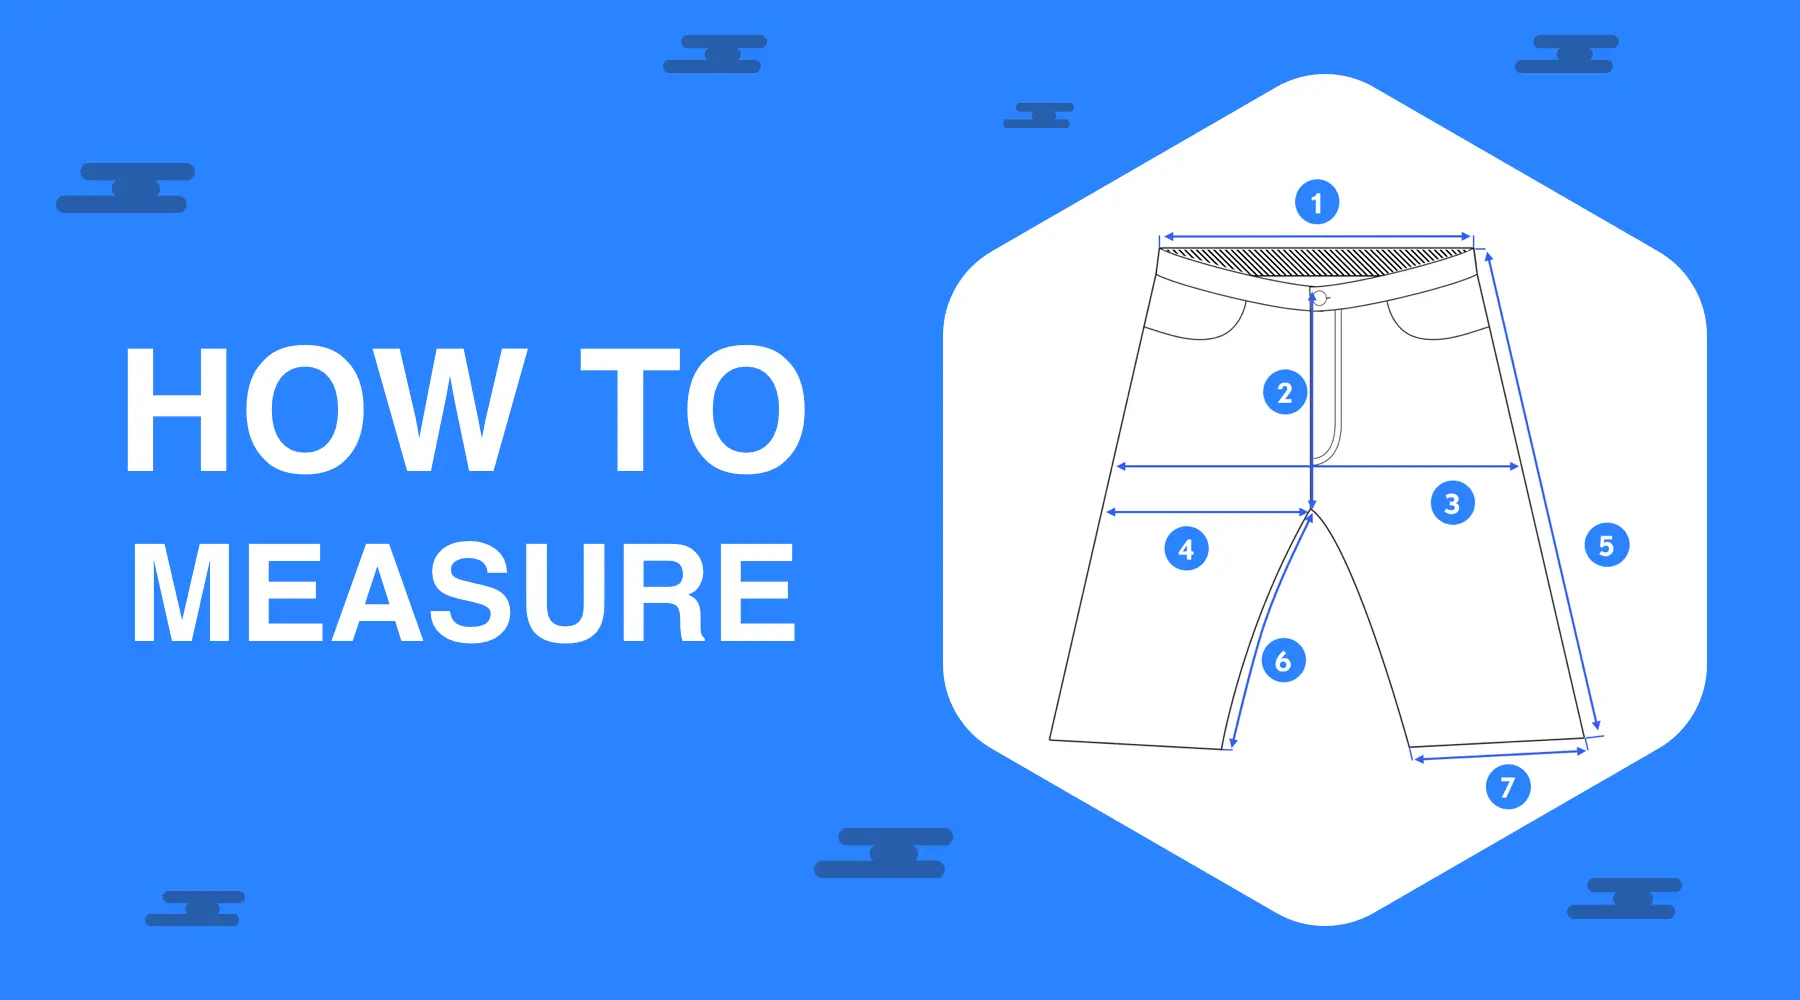
Spread the shorts flat and measure six points in fit-impact order: inseam, hip, rise, length, hem and width. Inseam leads, since it decides how long the shorts sit. Read the width across a relaxed waistband, not stretched. Hover or tap each step on the diagram to place the tape. Sizely builds those numbers into a size chart buyers trust.
With shorts, the question a buyer asks first is how long they sit, so inseam leads, not waist. Hip room and rise come next, deciding comfort through the seat. Quick listings tend to give a waist number and a vague length and leave it there. This guide marks all six points on the real pair, so the lengths and openings on your chart match what a buyer measures on their favorite pair.
- A
Inseam
Measure the inside leg from the crotch seam straight down to the bottom of the leg opening. Tap the step to follow the seam cleanly. This short run is the headline number for shorts, the difference between a five-inch and a nine-inch length, and it is what most buyers search by.Recorded as-is. Do not double.
- B
Hip
Across the seat at its fullest, a few inches below the waistband. Smooth the back flat first, then read edge to edge. The diagram shows the line, and this number is what tells a buyer there is room through the seat when they sit or move.Double it for the full hip circumference.
- C
Rise
Measure straight up the front from the crotch seam to the top of the waistband. Tap the step to see the run. Rise sets how high the shorts sit, and on athletic pairs it is short, which is exactly why it is worth listing rather than guessing.Recorded as-is. Do not double.
- D
Length
The full outside length down the side from the top of the waistband to the hem. Read alongside the inseam, it shows how much of the length sits above the leg opening versus below the rise.Recorded as-is. Do not double.
- E
Hem
Across the leg opening at the bottom edge. A wide opening reads loose and breezy, a narrow one reads fitted, so buyers use it to picture how the shorts hang on the thigh.Double it for the full leg-opening circumference.
- F
Width
Across the waistband at the top, measured with any elastic relaxed and flat. The diagram marks the line. On athletic shorts the band stretches, so a relaxed reading is the honest one and the stretched one will mislead a buyer.Double it for the full waistband circumference.
Put exact measurements on every listing, whether you sell on eBay, Shopify, or your own store.
Create your free size chart
Every garment measured in 0.92 seconds, with pro photos, labels, and descriptions, from your iPhone.
Lay the shorts flat and relaxed, and never stretch an elastic waistband to read it. Smooth the fabric, keep the tape flat, and let the band sit at its natural width. Hip, hem and width are across measurements, so double each for the body circumference. Inseam, rise and length are single straight runs and get recorded exactly as measured, no doubling.
Shorts size reference
| Size | Inseam | Hip | Rise | Width |
|---|---|---|---|---|
| S | 7 | 19 | 9.5 | 13 |
| M | 7 | 20.5 | 10 | 14 |
| L | 7 | 22 | 10.5 | 15 |
| XL | 7 | 23.5 | 11 | 16 |
| 2XL | 7 | 25 | 11.5 | 17 |
Frequently asked
How do I measure the inseam on a pair of shorts?
Lay the shorts flat and run the tape along the inside leg seam from the crotch point down to the bottom of the leg opening. That single run is the inseam, and for shorts it is the number that defines the style, since a 5 inch inseam and a 9 inch inseam look completely different on the leg. It is a straight run, so you record it as measured without doubling.
How do I measure athletic shorts with an elastic waistband?
Lay them flat and read the waistband width at rest, never pulled tight. A relaxed waistband width doubled gives a rough body waist, but the band stretches, so the listed range matters more than one exact number. Note the elastic in your description, because a buyer relies on that to know the shorts will give rather than sit rigid.
What is the difference between inseam and rise on shorts?
Inseam is the inside-leg run from the crotch seam to the hem, and it sets how long the shorts are. Rise is the vertical run from the crotch seam up to the waistband, and it sets how high they sit. Both are single straight measurements, so neither one gets doubled to a body number.
How do I measure shorts to sell online?
Lay them flat and relaxed, then record inseam, hip, rise, length, hem and width. Double the across points (hip, hem, width) for a body circumference and keep inseam, rise and length as single runs. Posting the flat numbers gives you proof when a buyer says it did not fit, since they can lay their own shorts down and check the same lines.
Should I measure shorts in inches or centimeters?
Either is fine, as long as you stay consistent and label the unit on the listing. Inseam is usually quoted in inches in the US and in centimeters in much of Europe, so showing both saves your buyer a conversion. Sizely lists both units on every chart automatically.
Related size charts & tools
Sources: Sizely garment engine, spec #4 (Athletic Shorts), six named measurement points. ASTM D6240 men's bottomweight body-measurement tables (representative ranges only). Last verified June 2026.
Make the right size obvious.
Join 85,000+ sellers showing measurements buyers trust. Free to start, no card needed.